Bike Handlebars Explained
Drop Bars, Risers, Bullhorns: How to Find the Best Handlebar Setup for Your Bike
Choosing the right handlebars for your bike and your riding style is key to enjoy riding to the fullest. Your handlebars, brake lever type, and bar tape shape the most important things for your bike: your riding positions, your potential speed, and your comfort.
Drop Bars Explained
Drops are THE classic handlebar. Drop bars are the most typical handlebar that you’ll see on fixed gear and single speed bikes, road bikes, and cyclocross bikes. Not only do they look killer, they’re the most versatile handlebar and offer the most hand positions that cover the spectrum from aggressive and aerodynamic to relatively upright and comfortable.
Since drop bars are one of most common type of handlebar, they come in a variety of bends so you can dial in your bike fit.
Drop Bar Hand Positions

The first hand position is on the top of the drop bar. This allows for a more upright and relaxed riding position. This hand position is great if you need to relax or see over traffic. The second hand position is on the hoods or over the top of the drops. This hand position balances comfort and aerodynamics while giving a lot of control over the bike. This is the default hand position on drops and most riders spend most of their time riding here. The third hand position is in the drops, giving an aggressive, aerodynamic stance that’s used for faster riding and short sprints.
Since drop bars are usually continuously wrapped with bar tape, anywhere that feels comfortable to rest your hands is another hand position. More hand positions means more comfort over longer rides and more speed. Drops are the standard handlebar for lots of types of bikes since they’re so darn versatile.
Drop Bar Brake Levers
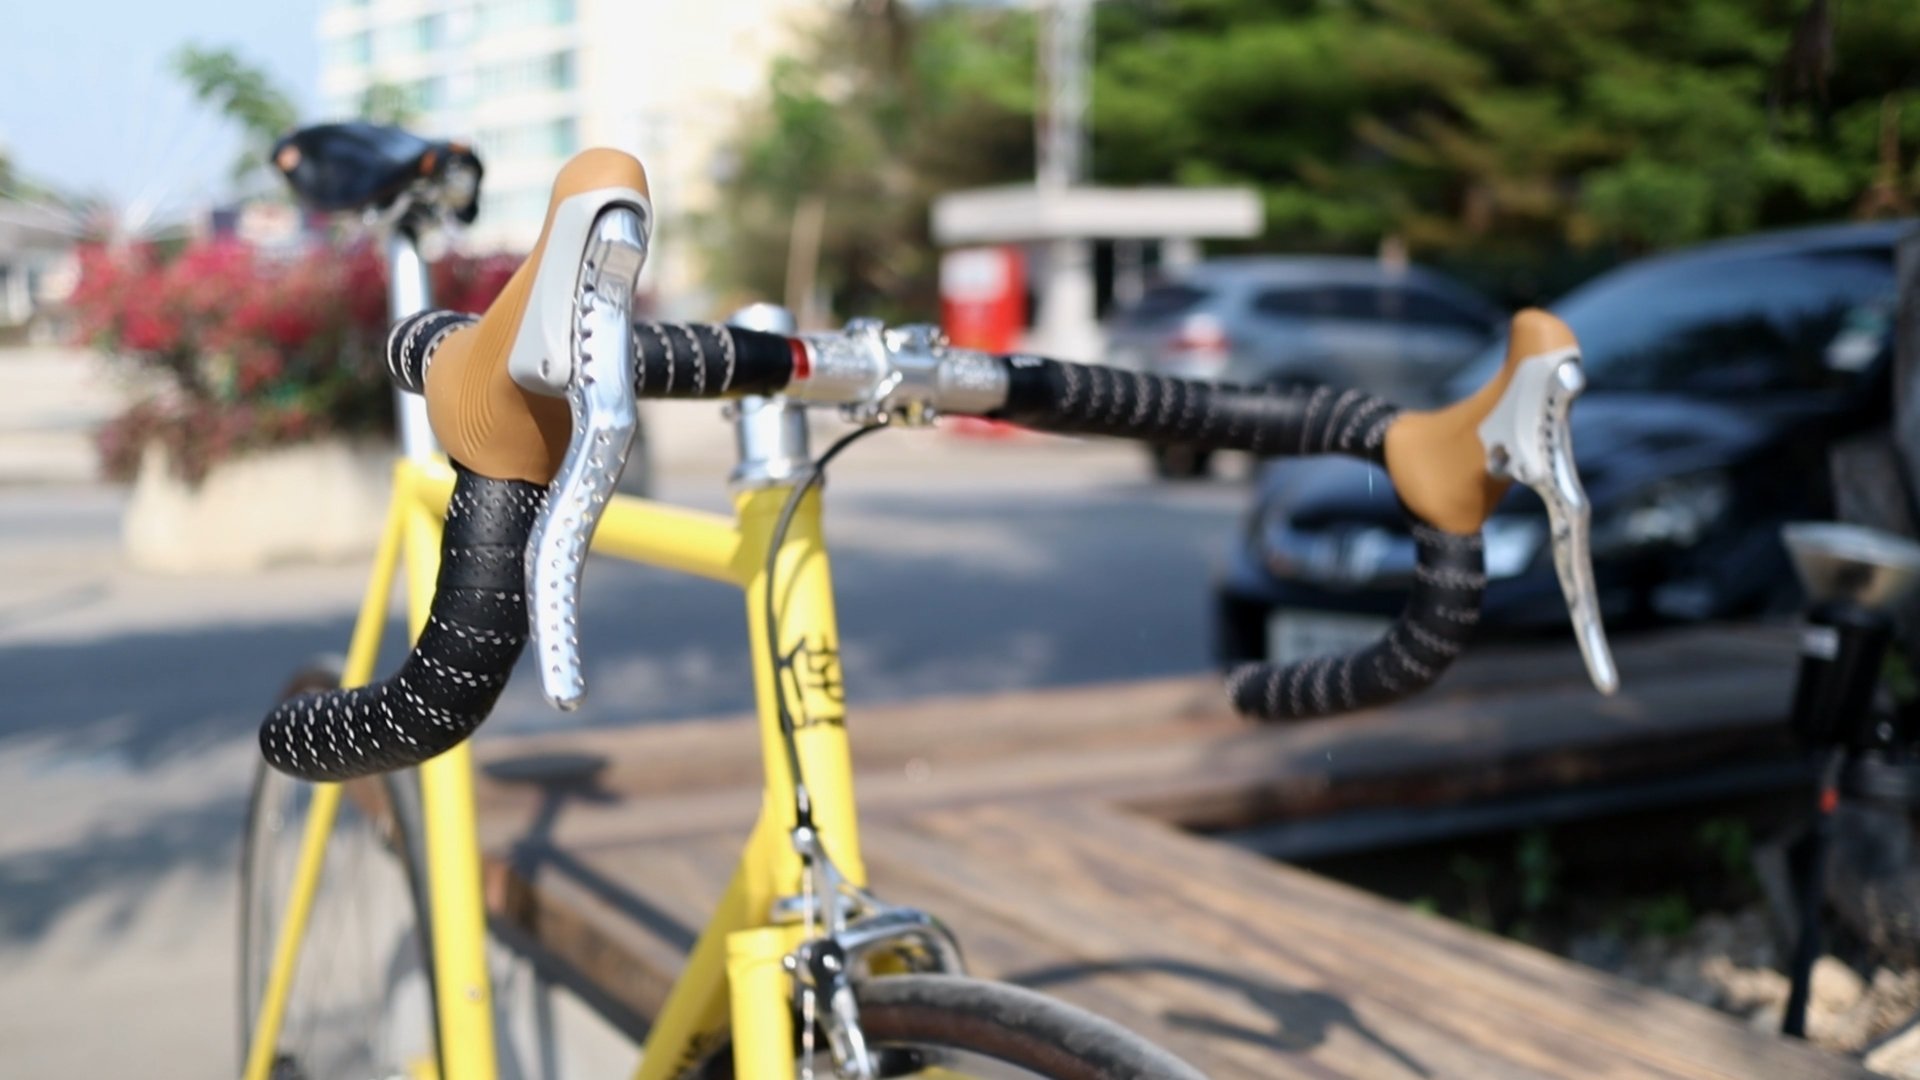
Drop bar brake levers
There’s two options when choosing brake levers for your drop bars: top mounted brake levers and drop bar brake levers. Top mounted brake levers are great if you prefer riding on the tops of the drop bar for a relaxed riding position. Most people though choose to go with drop bar brake levers that mount on the bend of the drop bar to balance speed and comfort while giving another hand position on the hoods.
If you’re riding a fixed gear and want to ride with only a front brake with drop bar levers, you can setup one lever to the front brake and have the other lever as a “dummy lever” that isn’t connected to anything. Just be sure to get spring-loaded drop bar levers so your dummy lever isn’t flaccidly flapping around when you ride.
But if you want the best of both worlds, you can run a cross lever setup that allows you to have both drop bar brake levers and top mounted brakes, giving you access to your brakes in two different hand positions. Neato!
Different Types of Drop Bars
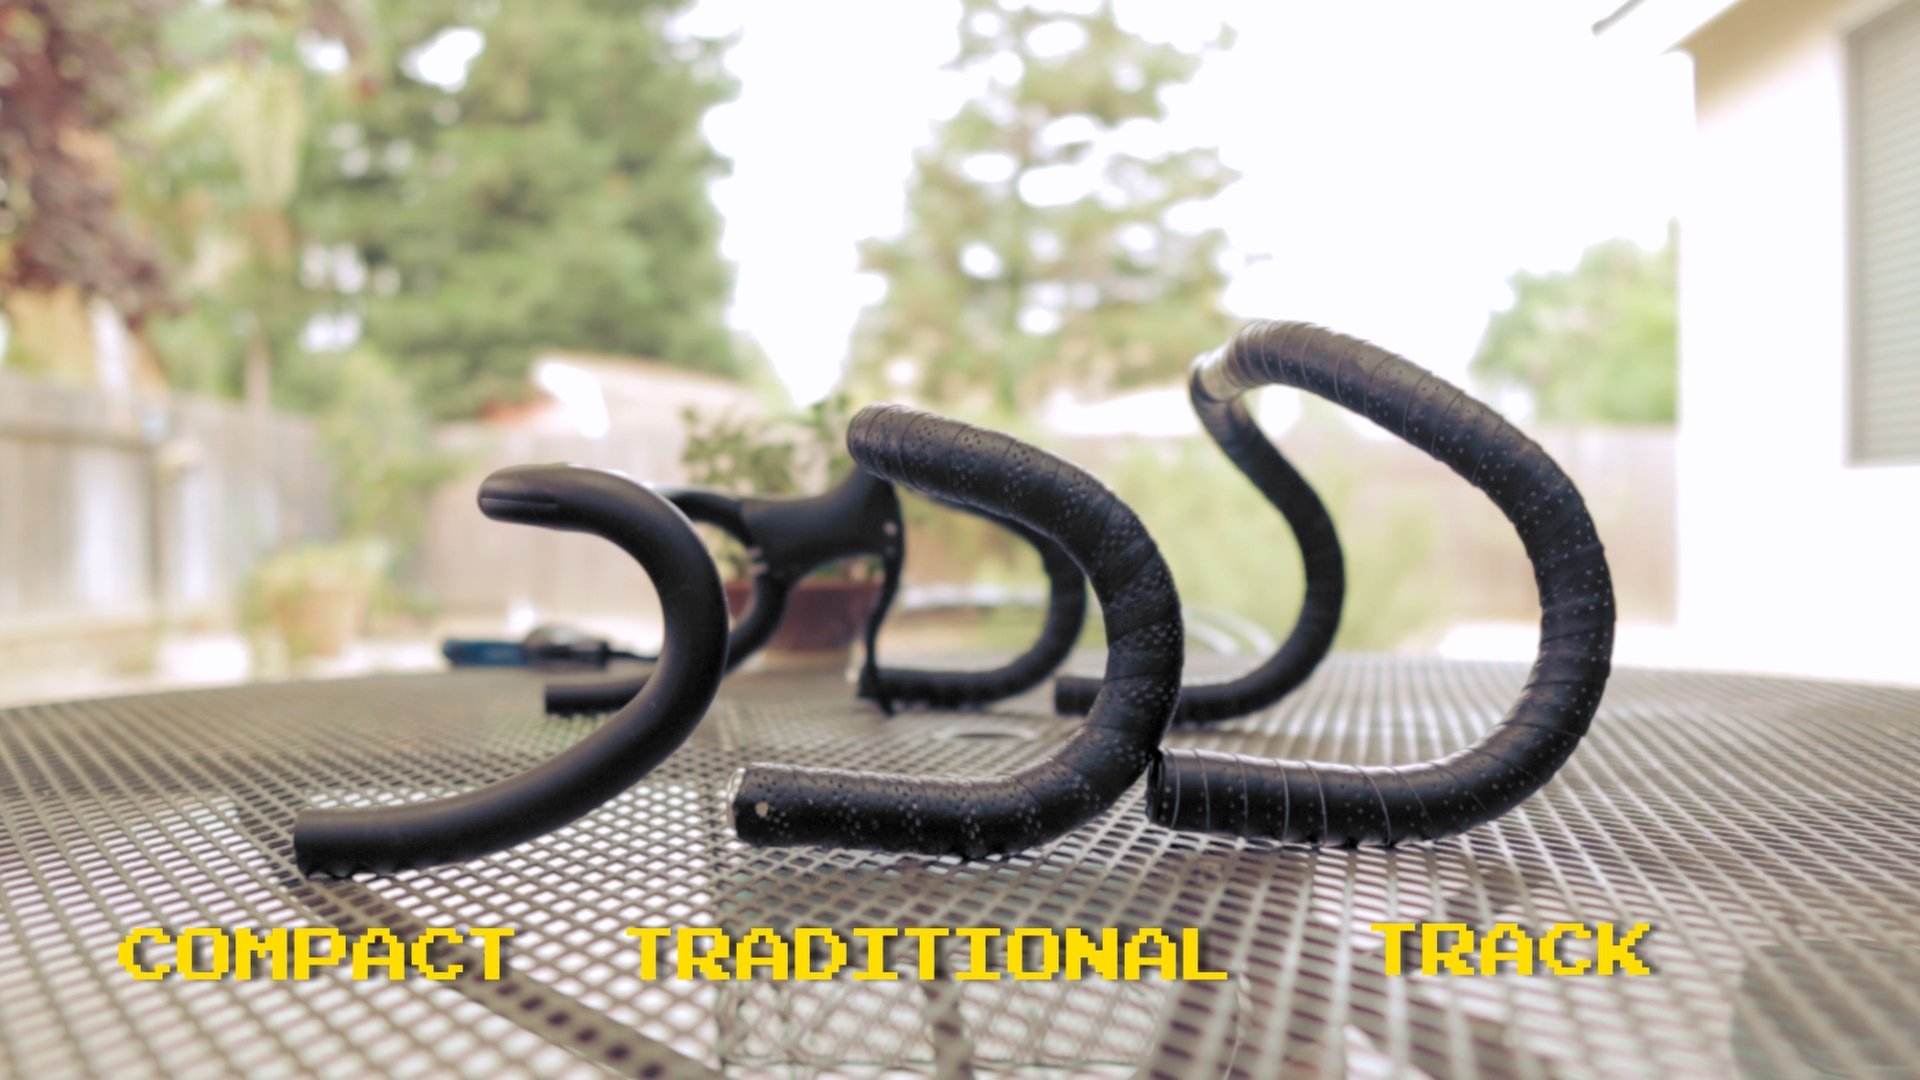
3 Different types of drop bars
There’s different types of drop bars depending on how aggressive or relaxed you want it to be. They come in all different shapes and sizes, just like people. Choose the right type of drop bar to get your bike fitting like a tailor-made suit.
Traditional drop bars have a longer reach (how far the bar extends outward form the clamp) and are a bit deeper, so you can get more aerodynamic on them.
Compact drop bars are exactly that: compact. The reach is shorter and the drop is shallower. These are great if you like the versatility of drop bars, but need a bit of a more relaxed riding position to be comfortable on your bike. Compact drops look more modern, they may be right for your bike based on that alone (I often choose bike parts solely based on how they look; I won’t judge).
Ergonomic drop bars flare out for a wide stance in the drops, giving the rider more control over the bike. It’s especially useful over rougher terrain making them popular amongst gravel and tracklocross riders.
You can use either top mounted or drop bar barke levers for all three of these bars.
Keirin/track drop bars are the most aggressive type of drop bar and have a steep, deep drop. They have a very short top section that only allows the rider to position the hands close to the clamp of the handlebar. They also curve aggressively, leaving little room for your hands to rest. You have only two hand positions on track drop bars: 1) on the tops 2) in the drops. These are the most specialized and least versatile drop bar. They’re made for getting low and going fast, comfort be damned. You can only use top mounted brake levers with track drops.
My Favorite Handlebars of All Time
If that all sounds like lot to consider, and you just want a great all-rounder handlebar, my favorite bar of all time is the Nitto 177 Noodle (affiliate). It’s, in my eyes, the perfect standard drop bar. It has a depth that’s aerodynamic but not too uncomfortable if you’re in good shape, a slight outward flare in the drops to give the rider more control, and a gentle curve to the hood position that makes it comfortable to ride even when brakeless. Also, they’re made by Nitto in Tokyo who is one of the oldest and best manufacturer of bike components. Strong, lightweight, comfortable, versatile, and they look great. What more do you need from a handlebar?
Riser Bars Explained
Riser bars are the go-to bar for a relaxed, upright riding position. If you’ve ever ridden a bike, you’ve ridden riser bars. They’re best used with top mounted brake levers. They’re a super approachable bar since everyone knows how to ride them and operate brakes with them. Simple, comfortable-ish: they’re a great choice if you want the least fussy handlebar.
But with less fuss comes less options. Riser bars only offer one hand position: on the grip area toward the end of the bar. You can get more hand positions out of your riser bars by wrapping them in tape instead of grips, but the hand positions you get won’t be terribly useful or comfortable. Risers are best if you ride short distances and like an upright position over a faster, aerodynamic position. With that said, they’re tons of fun to ride even if they are a bit slower than other handlebar choices.
Finding Risers That Fit You

Narrow and medium-width risers are the perfect bar for dense city traffic.
There’s three dimensions that you need to keep in mind when looking at riser bars:
Width: end to end measurement of the bar
Rise: how high the bar rises from the clamp to you hands, i.e. how upright it will ride
Sweep: the angle that the handlebar sweeps back from the clamp toward the rider
Each of these dimensions will affect how your bike rides, feels, and looks.
Narrow vs. Wide Risers
Narrower risers allow the rider to squeeze in through traffic while seeing over traffic at the expense of losing some control over the bike. Narrow risers also make it easier to store your bike in tight places like the trunk of a car or an over-priced studio apartment for ants. Traditionally, fixed gear riders preferred narrow risers since we’re all dirty city-slumming hipsters.
Wide risers have become really popular amongst the fixed gear crowd in recent years (i.e. significantly wider than your shoulders). They’re cumbersome, they weigh more, they’re easy to bump into things, but they have one big advantage over narrow or medium-width risers: they’re stupid fun to ride. Wide risers give you an insane amount of leverage and control over the bike, making it easy to flick your bike around with the strength of an enraged orangutan. It’s particularly useful for off-road riding and tricking. Just be careful when trying to split lanes.
Rise on Riser Bars
Depending on your ideal bike fit, you may want to go with more rise on your risers (still confusing, I know) for better comfort and an easier time looking at and enjoying scenery or less rise for a more balanced look and slight aerodynamic advantage.
Sweep on Riser Bars
Although most riser bars have very little back sweep, most people find more sweep more comfortable since it places the wrists at a more natural angle, instead of rotated 90 degrees which apparently is a pretty great way to develop carpel tunnel syndrome (I need to type less). If you’ve found riser bars to be uncomfortable, chances are you need a bar with more sweep to make your wrists happy.
Straight Bars
Straight bars are risers that threw rise and sweep out the window. They’re literally just a bar that is straight, and no I’m not talking about the local watering hole. Although they’re probably not as comfortable as regular riser bars for most people, they look super clean and can be super narrow for dense city riding.
Alternative Bars
Within the riser bar category are alternative handlebars like the moustache bar/townie bars. These handlebars take rise and sweep to the extreme to make handlebars that may suit your preferred riding position. In my experience, alt. bars are more comfortable than traditional risers since they tend to have more backsweep, making them easier on the wrists. Nitto Albatross bars are the gold standard for alternative upright handlebars.
Bullhorn Handlebars Explained

Riding on the horns with bar end brake levers, courtesy of Wabi Cycles
Bullhorns were originally made for time trial racing where they are often paired with clip-on aero bars. Bullhorns are basically drop bars without the drop portion. If you never ride the drop portion of your drop bars but you still like them, bullhorns are for you.
Bullhorns Hand Positions
You get two main hand positions: 1) on the tops 2) on the horns. The tops give you a relaxed, relatively upright hand position, just like tops drop bars while the horns give you a more stretched-out, aerodynamic hand position, just like the hoods of drop bars, while the drops don’t exist, unlike drop bars. You can also place your hands anywhere inbetween these two hand positions. Whatever feels good for you!
Brake Levers for Bullhorns
There’s two options for bullhorn brake levers:
Top mounted brake levers: mount on the top of the handlebar, same as for risers and drops
Bar end brake levers: mount at the end of the horns
Again, top mounted brake levers are great if you mostly ride on the top of the handlebar for a relaxed riding position. Bar end brake levers are the choice if you mostly ride in the more aggressive horns position.
Pursuit Bars
Pursuit bars are bullhorns that have a drop in the horn position, making them more aggressive and aerodynamic. They also usually have a longer horn position than regular bullhorns making you even more aerodynamic.
Important Things to Keep in Mind When Choosing Handlebars
Handlebar Material
Handlebars are usually made of one of the following materials:
Steel is heavy, but it’s also durable and stiff. It’s the cheapest material to make bars out of, so you can save a chunk of money if you don’t mind taking a bit of a weight penalty. The best material that balances price, durability, and weight is the following:
Aluminum isn’t as durable as steel, but it’s plenty durable for most riders and way lighter, and plenty stiff. Most handlebars on the market will be made out of aluminum.
Carbon is the lightest material to make handlebars out of. It’s also really stiff, giving you great power transfer, and it dampens road vibrations a bit, making them a bit more comfortable. But what’s the catch? There’s always a catch. Well, they’re expensive, but most importantly, carbon is the most dangerous material that handlebars are made out of. Unlike metals, carbon fails catastrophically. It snaps or explodes fantastically without warning. That’s the last thing you want your bars to do.
Handlebar Tubing Sizes
Handlebars come in different sizes that you’ll need to know to make sure all of your parts work together. The two sizes are the clamp size (the part that attaches to your stem) and the tubing size (the part that your brake levers attach to).
There’s three standard clamp sizes: 25.4mm, 26.0mm, and 31.8mm. Make sure that you match your handlebar’s clamp size with your stems clamp size, so it fits and doesn’t slip while your riding. Shims are available if you want to go from a smaller to a larger clamp size. 25.4mm and 26.0mm clamp handlebars tend to be less stiff and flex more while climbing and sprinting. They have more give to them, making them subjectively more comfortable. 31.8mm clamp handlebars are stiffer and offer better power transfer at the expense of a subjective amount of comfort. No handlebar clamp size is objectively better than the others, but like most things in cycling, comes down to personal preference.
Bars have different diameters at the grip areas than at the clamps. Make sure you get the right sized brake levers for your handlebar’s grip area. Most drops and bullhorns have a 23.8mm grip while most risers have a 22.2mm grip. Why? I couldn’t tell ya.
Be sure you match your bar’s clamp size with your stem’s clamp size and your bar’s grip size with your brake lever size so everything works together with the least jank possible.
Handlebar Grips and Bar Tape

Plush padded bar tape
Your choice of grips and tape come down to personal preference. Handlebar tape is mainly used for drop bars and bullhorns while grips are usually used on riser bars.
Your choice for grips and tape come down to grip, padding, and looks. There’s a lot of different materials for grips and tape from leather, faux-leather, cork, synthetic materials, and rubber that have different characteristics.
A good place to start is rubber grips and cork bar tape. From there, you can expand into different amounts of padding and textures that you like. Leather and cotton tapes offer very little padding, letting more road vibrations through and look sleek. Padded tapes like cork and synthetic tapes offer more cushion for your hands and tend to look bulkier.
My personal favorite is Fizik Microtex 2mm bar tape (affiliate). It’s faux-leather and looks great, has a little less padding to feel more connected with the bike, and has plenty of grip for my tastes.
Think of a color for grips and bar tape, and you can find it and then some (even some colors and patterns you didn’t even know existed). As a rule of thumb, it bikes look good when the grips/tape match the saddle, but there’s plenty of room for experimentation to add a little extra sauce to your bike.
How to Choose a Handlebar Setup That’s Right for You

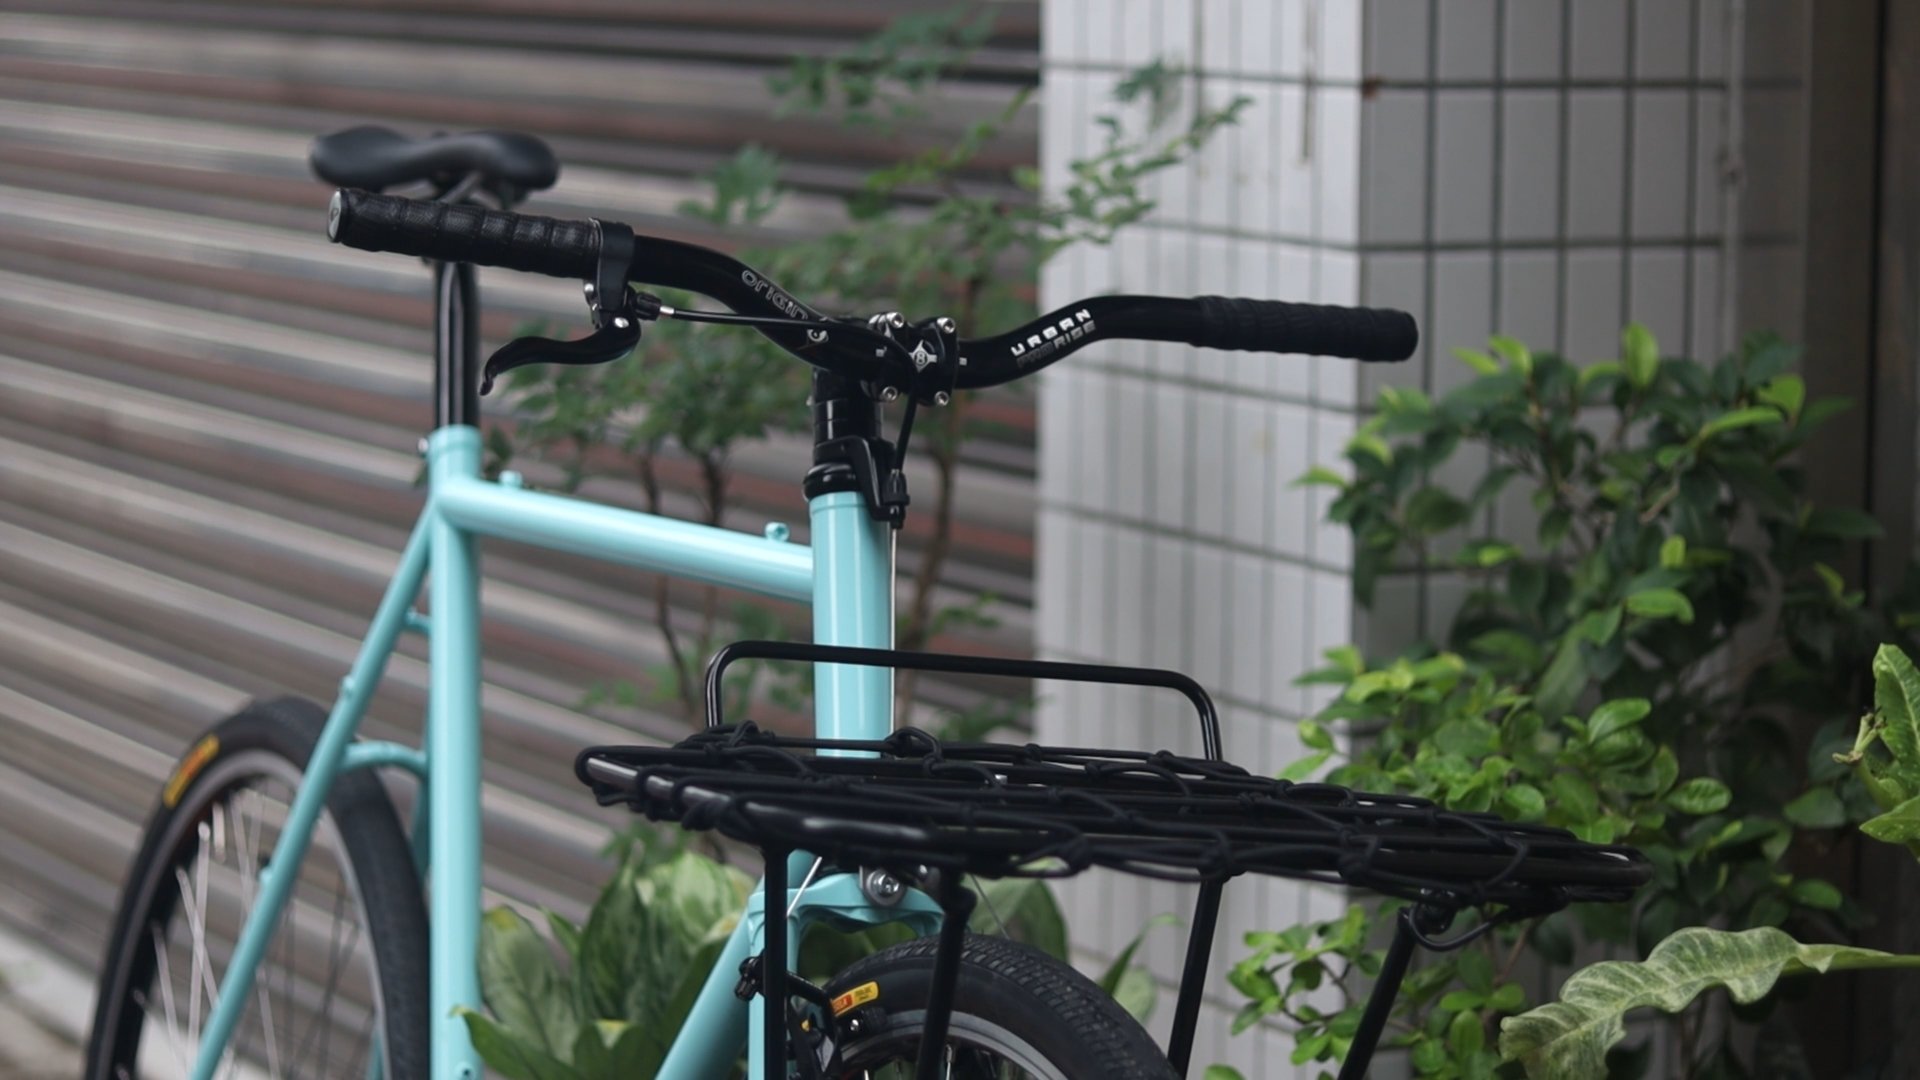
My brakeless riser bar setup with grips and plenty of clearance for a front basket
Ask yourself
How fast vs. how comfortable do you want your bike to be?
How far do you like like to ride?
Choose a handlebar type that’s best suited for the type of riding that you do: drop bars for long distances, bullhorns for less aggressive medium distances, risers for short distances visibility and comfort. These aren’t hard and fast rules, but it’s a good place to start.
A good rule of thumb is to get handlebars that are as wide as your shoulders (measuring the distance between the bony protrusions while standing up straight). This usually gives a nice balance of comfort and control over your bike while staying aerodynamic. I personally like getting handlebars that are slightly wider than my shoulders (~4cm) since that’s what I find most comfortable.
If comfort is a big concern for you, start off with a handlebar and stem combination that doesn’t make you bend to far over to reach them. The more upright your riding position, the more comfortable but also the slower it will be. Conversely, if you’re in good shape, you can go for a lower handlebar position for better aerodynamics and speed while sacrificing comfort.
You’ll also need to figure out the appropriate reach for your cockpit i.e. how far you need to reach to use the handlebars. This is affected by both the handlebar and stem dimensions. To find out what will fit you, be sure to do a DIY bike fit or go to a reliable bike shop that can get you fitted properly. It’s super important to fit your cockpit properly. A few centimeters of a difference off of your proper fit can be the difference between having a ton of fun on your bike and injury.
Handlebars Can Transform Your Bike
Finding the right handlebar setups for you can be daunting. There’s a lot to consider from handlebar type, dimensions, and bike fit. Just remember that bikes are supposed to be fun, and handlebars are a great way to breathe new life into your bike and make it ride completely differently. Bars are the simplest and most cost effective way to change the way a bike rides. They change the way a bike rides so drastically, that I only need to own one bike and swap out my handlebars depending on the mood.
Experimentation and riding your bike a lot is the best way to find out what you like. If you buy a cockpit setup and find that you don’t like it or it doesn’t fit you ideally, you can always sell it on the used market or donate it to a bike co-op where those parts can find the right home on someone else’s bike.
Don’t let the analysis and search for the “perfect” setup stop you from riding your bike. After all, what good is your bike if you’re not even riding it. A great setup is better than the “perfect” setup.
Ride on,